
DISCLAIMER: The blog below is generally created from the research listed in the “Referenced Material” section. This is not my research. All credit is given to these studies and researchers who are helping beekeepers better understand how we can improve our management practices.
Winter has hopefully ended for most of us and sadly our spring inspections have found a few dead outs but hope springs eternal because we also see colonies collecting resources and beginning the natural spring cycle of brooding up. So we go ahead and get those dead outs cleaned up and put our valuable frames of comb into storage until we need it later in the spring. Later, when hopefully we can rebuild by collecting a local swarm or even making splits from strong colonies. We also begin to wonder when and if we see concerning signs of swarming preparations that we know every year is just around the corner and what the colonies have been preparing for since last spring. Everything they do between swarming seasons is intended to prepare for the next year of swarming. The colony itself can be thought of simply as a brood factory and storage facility to prepare for that normal instinctive drive to reproduce/split and then to do it all over again year after year.
So why do most beekeepers concern themselves with spring swarms and splits? Likely they hope to grow their colonies and most importantly they don’t want to loss 60% of their bees in the spring through unmanaged swarming. As Layens horizontal hive beekeepers how can we work with the bees and protect ourselves from spring swarm losses? How can we enlarge our apiaries or even produce super honey producing colonies that will pay off in June? What is the management method that works within and alongside the bees natural and evolutionary instincts to swarm? The answer is Artificial Swarming.
Artificial Swarming
So, what is an “artificial” swarm? Why consider it swarming and why do we call it artificial? Let’s start with the word swarming first and come back to artificial. Bees will naturally, every spring and sometimes later in the summer, based on a set of conditions both within and outside of the hive, prepare to split and cast-off part of the colony and more importantly their genetics. I’ve discussed these conditions (“triggers”) in a previous blog called Understanding Your Local Swarming Process. The blog also contains downloadable information on the general timing of swarming in the Southwest Ohio area that you can adjust for your area and seasonal differences. There are many techniques that beekeepers use to try and discourage their colonies from building up the resources and energy to swarm but the colonies instinctive drive is extremely strong and some colonies swarm anyway. In fact, it is my belief that instead of diminishing their drive we should use it and work with the colony to achieve exactly what they want to do…cast off part of their colony and last year’s queen.
This gets us to the topic of “artificial.” It’s artificial because the beekeeper determines when and how it happens, but we also work to execute this within the natural timeframe the bees themselves would have done it. We monitor our colonies closely for signs of the swarming triggers and anticipate when they might begin creating swarm cell. At this point we execute a split just before cells are created. When we split, we remove the queen and some bees just like a swarm would have but we don’t loss bees to the wild and we leave a large parent colony that has significant resources to not only quickly create a queen cell but the possibility of creating a significant number of cells.
If you are a commercial beekeeper or sideliner with many hives this process might be time consuming and impractical for your spring management style. You may also be someone who naturally allows your colonies to swarms or just doesn’t want to bother. But if you’re someone who is interested in working within the natural rhythms and genetic energies of the colony, I would encourage you to read further.
Are They Ready
Okay, let’s go through this step by step and once you’ve done it, I believe you’ll do it year after year. As a quick review, what are we looking for? Is it time? Is it time based on the colony?
- In your area have you been able to complete a spring inspection?
- Are you seeing that your colony is bringing in pollen consistently?
- Is your colony of a size you can split them? If you don’t have 4-6 frames of mostly brood, you should wait. You can have honey/pollen frames, but your number of brood frames is critical. Your colony might be weak and may not swarm this year. This colony would not be a good candidate, and you could risk the survival of the current queen and the parent colony. Split only strong survivor stock. Aggressive splitting might get you the numbers but could leave you with small colonies that will die over the next winter unless recombined.
- Do you see that the queen is starting to lay drones (drones always come before swarm cells)? When was the first time you saw drones and have they emerged and/or flying? Drones can be present 2-3 weeks before the start of swarm cells because of their longer development cycle and need to sexually mature before mating. But 3-4 weeks maybe stretching it unless you have had a significant spring weather event.
- Do you see any signs of the colony starting to build swarm cells or starter cups?
- Do you see the increase in foraging opportunities in your area?
- Do weather forecasts indicate a warming period of 3-5 days with nighttime temperatures steadily increasing?
- Do you expect a warm sunny day with calm winds within that upcoming warming period?
If you have said yes to all the above or at least most of them, you likely are in a period that you can execute an artificial swarm/split. Remember, you want to do this right before or within the week you think swarming normally happens in your area. If you are starting to hear of swarms and/or that people are getting calls to remove swarms your time is now. The only situation that might cause you to wait is, as mentioned above, if you see a downturn in the weather with rain and a week or so of cool days/nights forecasted. Colonies can sense what is coming and may put a pause on their preparations. You’ve likely seen signs of this pause or even the consequences of these weeks of cooler weather. Watch the entrance of your hive. If you see them pulling out white larvae it maybe they are reducing their drone load for a time (they consume critical resources) or the cool weather has chilled unprotected brood (chill brood). If this happens prior to seeing any swarm cells it may reset the clock by a couple weeks unless followed up by a quick blast of warm spring weather…..keep your eyes on the hive and on your weather app. I highly recommend the Weather Underground app.
Are You Ready
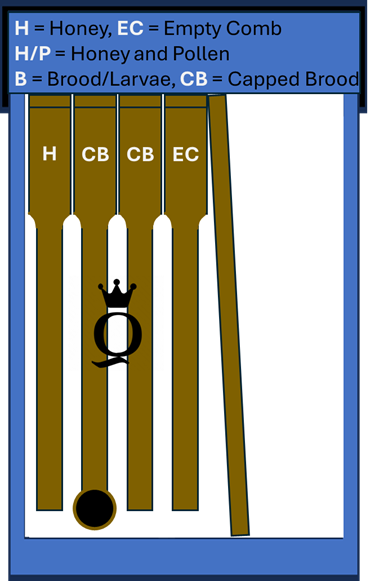
I recommend that you have an extra nuc box, swarm trap or hive to put the over wintered queen and frames from the parent colony into. If you are using a swarm trap that holds 6-7 frame you might be able to get through May (in our area) before you need to move them into a bigger space that is if you don’t have plans to recombine with the parent colony to focus on honey production…more on that later.
Do you have a spot setup to put the split? If you are working with a backyard space, you may want to set the split on the other side of your yard. This will give it the best chance and is close enough if you need to shake more bees in later. If you have a few acers to work with place them a couple hundred yards apart. What you are trying to do is keep as many foragers as possible with the old queen but one way or the other you can always shake a frame of nurse bees in later to increase their numbers.
If you plan to feed the split this is also the time to get that ready. Are you going to put in an extra frame of honey from last fall? Are you going to use a frame feeder or canning jar? Getting this all ready before you begin will assure your attention is squarely on the colony, the frames you are pulling, and most importantly assuring you find the queen. Yes, we are looking for the queen to assure she goes with the smaller split verses staying with the larger parent colony. We want the energetic parent colony to work on making as many queen cells as they can from the best eggs possible. This is not a walk away split but if you don’t want to find the queen or can’t then I suggest you simply divide the parent colony in half at this time. If you do this, you might need two hives instead of a nuc or trap but as beekeepers we are adaptable and can likely work with whatever equipment we have. Just plan ahead.
Here We Go
So, you’ve picked a beautiful day where you have the time to do this right and complete all the steps without interruption. You have your spot and stand for the new split and all your equipment ready. Since you are working with the frames from the parent hive you don’t need any other equipment than what you use to do a normal hive inspection.
- Step 1 – Place your nuc/trap right next to the hive you are creating the artificial swarm from. It’s good to have this at a height equal to the parent hive. A simple stand for it is often a 5-gallon bucket but make sure the stand is secure. You don’t want to lose everything by having it tip over on you. That would make for a very bad day. Have the lid easily accessible so you can close the nuc/trap as you are adding each frame to calm them with the darkness and keep flying bees in as much as possible. Also, close but vent the entrances to the nuc/trap. In this way you don’t have bees flying right out the entrance as you are trying to add them.
- Step 2 – Smoke and begin to work your way through the parent hive from the follower board all the way over to the outside wall. Note what honey and brood frames you have. Consider marking the frames so you will remember over the next 20-30 minutes as you are completing the split. If, while you’re going through the frames, you happily find the queen on a brood frame immediately place this frame with the queen in the nuc/trap no matter if the brood is capped or not. A good habit while going through the frames is to push them back together as you go from one frame to the next. In this way you are allowing the colony to stay as calm as possible and helping the queen not to run from the light…making it harder to find her later if she is skittish and a runner.
- Step 3 – If you haven’t found the queen yet get ready to calmly and methodically to go back through the frames especially keeping your eyes open on those frames you marked and see as having brood. These will be the most likely spots but don’t get exasperated. I have sometimes even found her on a frame of honey on the frame right next to the wall of the hive. The point here is you know she is there and don’t let impatience or fear take hold. You will find her or after 30 minutes of looking you may need to consider option 2 (walk away split) that you have previously considered and prepared for the consequence of. Before you make this decision assure you have checked any clumps of bees on the walls or bottom of the parent hive for her presence.
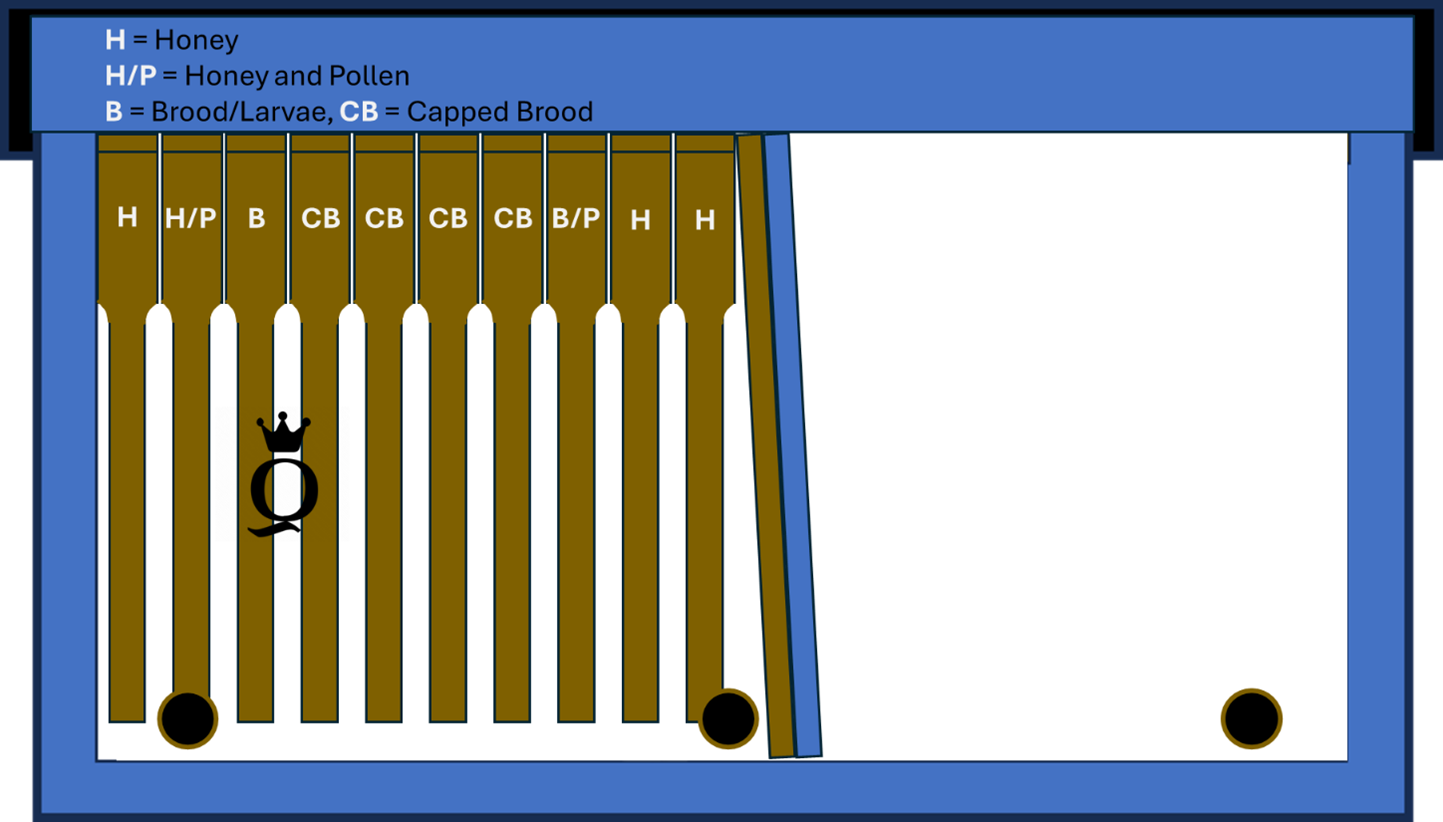
- Step 4 – If successful in step 3 you now have the queen and a frame of brood in the nuc/trap and are ready to add the additional frames before closing everything up. We are looking to have 2 frames of brood to go with the queen. These should be frames of capped brood so that she will have a generation of emerging workers as soon as possible. The frames should be heavily covered with nurse bees that will shortly transition to foragers. So now you have the queen, and 2 frames of capped brood covered with nurse bees in the nuc/trap. Now add a heathy frame of honey with whatever bees are on it. Lastly, place a frame of empty comb and shake another frame of nurse bees into the nuc/trap before you put the lid on it for the day.
You will be wondering how you should order the frames as you put them into the nuc/trap. I suggest the following order. We begin next to the wall closest to the entrance…
- Frame 1 is the honey frame. This position does a few things for the small colony. It provides insulation for the colony and brood frames from the temperature changes next to wall. It also acts as thermo mass which can release captured heat from the brood during the cooler nights. If the frame has some pollen on one side put this side closest to the brood frames
- Frame 2 and 3 will be the brood frames
- Frame 4 will be the frame of empty comb. Could you use a frame of honey if you have it, yes. Would this be better, yes if you have it but if you make this change, I suggest actually making it the 5th frame and still put a frame of empty comb in the 4th position so the queen can immediately continue to lay and build up this new and small split as quickly as she can.
- Close everything up with the follower board.
- Step 5 – With everything now in the nuc/trap close the lid and close up your parent hive. It’s likely that given the activities the parent colony is upset and if you need to use some smoke to drive them down from the top bars now is a good time to do that. Be patient with this process too since you don’t want later in the day to remember something and have to get back into them. The parent colony needs time to settle down and begin the process of understanding they no longer have a queen. Also, since you left frames of brood that may not be capped it is important that the colony has the time during the daylight hours to raise the temperature back up or you will end up causing some amount of chill brood. We always start working our hives between 11am to 1pm when most of the foragers are out making it easier to see the queen and know what nurse bees you have.
- Step 6 – With everything closed in the parent hive and nuc/trap now you can take a breath and calmly move the nuc/trap to its new and likely permanent location for at least the next month or two based on how the old queen builds up this artificial swarm. Once in its new location you can open the entrance but only half way. This will help reduce the chance of robbing. Don’t be surprised or concerned if you see a few bees taking off quickly to return to their old home. These are the foragers you invariably included when you moved the frames. The nurse bees that can’t fly yet and are instinctively locked to the brood will stay. As previously mentioned, in a day check this nuc/trap and make a determination if you need to shake in more nurse bees. Since the nuc/trap is small it should look full and if not, it won’t hurt the parent hive to take another frame of brood and shake a few more nurse bees into the nuc/trap. I would not suggest doing this more than once so you don’t damage the parent colonies emergency cell building that they will start within 24-48hrs.
Okay, you are now done for the day. Clean up and enjoy looking at your colonies while enjoying your favorite beverage. You’ve done a good job!
What’s Next
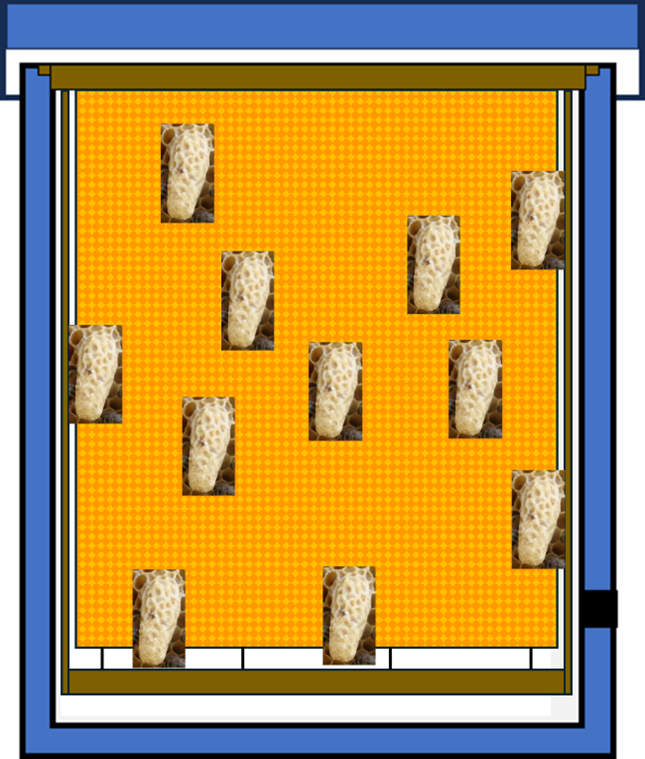
Over the next week don’t get back into the parent hive outside of grabbing a few more nurse bees the next day if required. Within 24-48hrs they will realize they are missing their queen and immediately begin building emergency queen cells. Unlike true Swarm cells that are found normally at the bottom of a frame or on its outside edges or Supersedure cells that are normally built on the front of the frame, Emergency cells can be built anywhere on the brood frames that the workers find healthy well-fed eggs/larvae from 2-3 days old. Based on the age of the egg/larvae you will likely see differences in the size of the queen cell. Smaller queen cells/queens will likely come from younger eggs given they have been fed for less time before beginning the process of building the queen cell. Studies have also indicated that you will find more and healthier queens on comb that is 1 years old and declining in quality of older comb up to 4-5 years old. Studies also show that the parent colony will stop building cells after the 5th day. This means that after one week you can get back into the parent hive and decide what you want to do.
Split or Super Colony
This is what you will ponder all week until you get back into the parent hive one week after the artificial swarm split. You now have an important decision to make and if you delay it will be made for you by the colony. What do I do with all the new emergency cells and do I want to grow a super honey colony or expand my apiary?
If you want to expand your apiary…
- Prepare by organizing a few more nucs/traps and locations for what will be your new splits.
- Your work in the parent colony will be to determine how many brood and honey frames you have. This will determine how many of the emergency cells you can take advantage of. It is possible to harvest extra queen cells by cutting them out. This will require you to keep them warm and moist and have someone who wants to pick them up right away. I’ll let you figure out if that is something you want to investigate. As with the original artificial swarm you will need 2 frames of brood and 1 frame of honey for every split. How many groups of frames do you have and how many splits can you make?
- Make sure you only leave 2 well formed emergency cells in each split you create. Crush any other cells on these brood frames.
- You will want to leave at least 2 brood frames and some honey frames in the parent colony. Again, select two cells to keep and crush the rest.
- Close and move everything into their new home reducing the entrance. Leave the parent and the splits alone for 1 month to allow the queen to emerge, mature, have her mating flights and begin laying. If you check back in a month and don’t see eggs (no need to find the queen) give it one more week and check again. Also reduce the entrance on the parent hive if you’ve knocked it down to just a few frames.
If any of the splits or the parent hive appears queenless after a month + 1 week then consider recombining this hive with one that has a queen. See below for that process.
If you want to recombine and create a super honey producing colony…
- Acquire a standard plastic Langstroth queen excluder. Cut one side so that the excluder slides down into the hive and fits snuggly side wall to side wall standing upright against the side of the frame. You will want the excluder to go from the top of the top bar all the way to the floor of the hive. No gaps on the sides or bottom allowing bees to crawl through. You will put this flat against the outside frame in place of the follower board.
- Attach (maybe tape) a piece of newspaper to the queen excluder before you install it. Cut some slits with a sharp knife in the paper. This allows the queen pheromone to pass through and gets the bees started at chewing their way into the other colony.
- Take the frames and bees from the queenless colony and place them in the empty area of the hive right up against the other side of the queen excluder. Add the follower board to the outside of these frames and close the hive.
Within a day or so the bees from both colonies will chew the paper from their side of the queen excluder and naturally recombine giving you a colony twice as large as it was before. The hive that was queenless has likely continued to build up honey stores over the last month without having new brood to feed so it is honey heavy. The colony with the new queen has also spent a month adding additional stores so now you have twice as much honey and a large number of older foraging bees who will continue to gather spring nectar.
With this method you can keep your colony count the same, manage the swarming tendency and build up larger honey producing colonies.
Conclusion
I hope everything above is clear and understandable. In a lot of ways splitting is conceptually the same from one hive style to another with just some differences in the physical steps. What I believe is slightly different in the Artificial Swarming method is that you are trying to work as closely as you can within the colonies timing and behaviors. As with any animal its important to allow them to sexually mature which assures they develop properly and grow into the adult they genetically are supposed to. The release of the hormones and proteins during this phase will have critical physiological benefits. We want the workers, in all their stages, to experience the changes in their bodies and glands that come along with preparing to swarm while assuring we don’t loss bees and as an added benefit take advantage of that very important broodless period that helps in their defense against Varroa and other pests.
Reference Materials
- Beehive splits: What they are and how to make them
- How Honey Bee Colonies Survive in the Wild: Testing the Importance of Small Nests and Frequent Swarming
- Swarming, defensive and hygienic behaviour in honey bee colonies of different genetic origin in a pan-European experiment.
- Evaluation of three methods of artificial colony division in honeybee, Apis mellifera adansonii (Hymenoptera: Apidae): Initial response of daughter colony
- Comparative study between two beehives in artificial swarming in beekeeping
- Genetic Diversity and Biological Activities of Nuclei from Swarming and Dividing of Honey Bee Apis mellifera L. Colonies
- Wild honeybees offer clues on preventing colony collapse
- Colony Division: An Easy Method to Split a Colony
- Colony Division: Five easy steps to split a honeybee colony
- DIVIDING HONEY BEE COLONIES
- Understanding Colony Buildup and Decline
- Swarm Control for Managed Beehives
- Build Your Apiary or Prevent Swarming by Splitting Hives
- Foolproof Splitting
- How to do Splits
- Emergence of Swarming Behavior: Foraging Agents Evolve Collective Motion Based on Signaling
- BENEFITS OF COLLECTIVE INTELLIGENCE: SWARM INTELLIGENT FORAGING
- Create an Artificial Swarm with a Taranov Split
- Using artificial swarms for Varroa control